5.1 The House Board
5.1.1 What the House Board Is and Why It Works
The house board is the household's central physical information point. It gives residents one predictable place to find the information they need to live in the house without having to remember everything they were told, search through old messages, or ask you every time a routine question comes up.
Most of the board is permanent or semi-permanent reference information: the house info sheet, culture guides, emergency information, the Community Contract, parking information, and any other house systems residents need to reference. It should also have a smaller flexible area for current announcements, coupons, local information, and things residents want to share.
The technology is simple. The value is in making important household information visible, consistent, and easy to find.
It gives residents somewhere to look first.
You will cover a lot during onboarding, and nobody remembers all of it. The board gives residents a place to check later when they need to know the WiFi password, trash day, guest parking rules, where something belongs, or what the expectation is for a shared space.
It creates one source of truth.
House information naturally ends up scattered across emails, group chats, texts, lease documents, and conversations. Over time, residents can end up working from different versions of the same information. The board gives the house one visible place where the current version lives. If something changes, update the board.
It keeps household expectations visible.
Residents sign the Community Contract when they move in, but it should not disappear into a lease file after that. Keep a printed copy on the house board so residents can refer back to the shared expectations that govern the house. Printing it on a different color of paper can help it stand out from the other reference materials.
The same applies to culture guides and other house systems. When expectations stay visible, they are easier to remember and easier to reference when something starts to drift.
It lets onboarding continue after move-in day.
Residents do not need to learn every house system at once. They can come back to the board as those systems become relevant. Someone may not care about the furnace filter schedule or guest parking during their first week, but they know where to find the information when they eventually need it.
It keeps routine questions from running through you.
You should not need to personally answer where guest parking is, which fridge shelf belongs to which room, or what the bathroom expectations are every time the question comes up. The board lets residents handle ordinary questions themselves and leaves you available for the things that actually need operator involvement.
Live-In Operator Note
If you live in the house, it is easy to become the default source for every small question because you are already there. The board helps prevent that. Put routine information where residents can find it themselves, and direct them back to the board when the answer is already posted.
It works when you are not there.
This is especially important for an off-site operator. Residents need to be able to navigate the house and its systems without waiting for a response from you. A good house board makes the basic operation of the household less dependent on any one person being available.
It gives the household a shared communication space.
Not everything on the board needs to be permanent. Leave room for current announcements, reminders, coupons, community events, or other things residents want to share. That flexible space gives the board some life and makes it useful to the household beyond operator-posted instructions.
The standing information should still be clearly separated from temporary items so important house systems do not get buried under announcements.
The Board Is Not Optional Just Because the Chore System Is
Some houses use the chore wheel and some do not. The house board is still useful either way. House information, culture guides, emergency instructions, the Community Contract, and other shared references still need a visible home. If you do not use the chore system, leave that section off the board and build the rest.
The house board is not just a bulletin board, and it is not just a chore board. It is the physical home for the house's standing operating information, with enough flexible space to support the everyday communication of the people who live there.
What the board includes is covered in What the House Board Includes.
If your house uses the chore wheel, the board is also where that system lives. The chore system itself is covered in The Chore System: Setup, Maintenance & Troubleshooting.
5.1.2 What the House Board Includes
The house board system has three parts: standing house information, the chore system if the house uses one, and open space for temporary household information. Keeping those three functions distinct makes the board easier to use and easier to maintain.
The corkboard is not the whole system.
Most of the standing reference material can hang beside the board rather than taking up cork space. Print each sheet, sleeve it in a clear protector, and group the sleeves onto keyrings. When this manual refers to the house board, it means the corkboard and the reference materials kept with it.
A. Standing House Information
These are the sheets residents come back to for as long as they live in the house. They should stay available even when nobody has needed them in a while.
House basics:
- House Info Sheet. The quick reference for the property: address, WiFi information, trash and recycling days, key contacts, payment portal, and other basic house details.
- Community Contract. Keep a copy posted. Residents sign it at move-in, and it should stay visible rather than disappearing into a file. Take the signature page off the posted copy. Printing it on a different color of paper makes it easy to find and signals that it is the agreement the house runs on rather than one more guide.
Shared spaces and house culture:
- Bathroom Culture Guide
- Kitchen Guide
- Fridge & Freezer Guide
- House Mailbox Guidelines
- Parking Guidelines
- Resident Shared Storage Guidelines
- Shared Tools, Supplies & Equipment Overview
Safety:
- Emergency Quick Reference. What to do in the first 90 seconds of a medical emergency, fire, flood, or gas leak. Keep it with the general reference materials where residents can get to it quickly.
The Cleaning Bucket Reference works differently from the rest. Residents need it while they are cleaning, not while standing at the board, so its primary copy belongs at the point of use. Post a protected copy in the bathroom, on the back of the door or somewhere else visible without being the first thing a guest sees. A laminated copy kept in the bathroom bucket also works. Unlike the sheets on the board, this one does not change, so laminating it is fine. Keeping a copy with the house board materials is optional.
Do Not Post Resident Access Codes
WiFi information can go on the house board. Door codes, bedroom codes, lockbox codes, alarm codes, and other credentials that provide physical access to the house should not be posted in a common area. Send those directly to the people who need them.
B. Conflict Resolution Materials
Keep the resident-facing conflict resolution materials with the house board references so residents can find and use them without asking the operator for the tools first.
The resident-facing set:
- Conflict Resolution Start Here
- The QuickConnect
- 5 Step Flow Conflict Resolution Map
- 5 Step Flow Prep Worksheet
- 5 Step Flow Step-by-Step Checklist
- Feelings & Needs Cheat Sheet
- Our Shared Solution
These serve different parts of the process, so keep the whole resident set available rather than posting only the 5 Step Flow itself. How each tool is used is covered in Conflict Resolution & Enforcement.
Three documents in the conflict resolution suite are not house board materials. The Feelings & Needs Reference, The Shared Solutions Guide, and Facilitated Conversation Companion are operator and facilitator references. Provide those when someone needs additional support or is about to help facilitate a conversation.
C. The Chore System
If the house uses the chore system, reserve part of the corkboard for the chore wheel and points grid, with Chore Descriptions and Chore Board & Points available as references. Houses that do not use the chore system use the rest of the board normally and simply leave that area out.
How the chore system works, how roles and point values are chosen, and how to build the wheel and grid are covered in The Chore System: Setup, Maintenance & Troubleshooting.
D. Household Sharing
Leave part of the corkboard open for temporary information: announcements, reminders, event flyers, coupons, local information, and anything else useful to the household right now.
Keep this area separate from the standing references. Temporary information should be easy to add and remove without covering or displacing the information the house needs to keep available.
Push 50 to 100 pins into the open area of the board when you set it up and leave them there. The pins should live on the board where they get used, not in a box or drawer somewhere else. Residents should be able to post something without having to find supplies first.
What belongs on the board versus what should go to the group chat, email, or a direct message is covered in When to Use Which Channel.
Together, these make up the reference, system, and community areas used in the board layouts later in this chapter.
The next step is deciding where the board and its reference materials will fit in the house. See Where to Put the House Board.
5.1.3 Where to Put the House Board
Put the house board somewhere residents will see it regularly while going about their normal routine, and somewhere they can stop long enough to actually use it.
The best location depends on the layout of the house. Start with the kitchen or dining area, then work outward based on the space you have.
Kitchen and dining areas.
These are usually the best locations because residents spend time there instead of only passing through. A dining room works especially well because the board stays in view while people are sitting down to eat. A kitchen catches people while they are making coffee, cooking, unloading groceries, and moving through the house.
Open-concept kitchen and dining areas are especially useful because they combine both kinds of traffic and often have more usable wall space.
The main limitation is wall space. Kitchens are full of cabinets, appliances, windows, and doors, so sometimes there simply is not enough room for the board and the reference packet without crowding everything else.
Living room, entry, and mail areas.
If the kitchen or dining area does not have a good wall, look at the living room or entry area next. These can work very well as long as the board is visible without becoming the focal point of the room.
Corners near the entry are often useful, especially when the room has more space than it really needs for furniture. A board on a side wall or in a corner can stay visible to residents coming and going without taking over the room.
If the house has a mail area, that can make a particularly good spot. Residents already stop there to check mail or pick up packages, so putting the house board nearby gives them another reason to notice it.
One Layout That Worked
One house had no usable wall space in either the kitchen or dining area. The living room had an open corner near the entry that would otherwise have been mostly unused. The mail rack and package table went on one wall, and the house board went on the perpendicular wall. Residents pass both as they come into the house and can check the board while they are already stopped at the mail area.
Hallways can work, but usually are not the first choice.
An entry hallway or other wide transition area may work if there is enough room for someone to stop and use the board without blocking the path.
Narrow bedroom hallways are usually a poor fit. Residents are mostly passing through them on the way somewhere else, and there is often not enough clearance for someone to stand at the board while another person walks past carrying groceries, laundry, or something bulky.
A. Placement Within the Room
Once you have the right general area, look for a wall where the board is easy to notice without dominating the room.
In a living room, for example, the board usually works better on a side wall or in a corner than directly across from the main seating area. The goal is for residents to encounter it regularly, not to make it the centerpiece of the room.
There should be enough room for someone to stand in front of the board, read something, flip through the reference packet, use the chore system, or post a notice without blocking the main path through the room.
Mount it at a comfortable height. Residents should be able to reach the top and bottom of the board and use the reference packet without stretching or crouching.
Do not choose a wall where residents have to lean over a couch, cabinet, or other furniture to use the board.
B. What the Location Needs
Before you commit to the wall, make sure it has:
- Enough room for the board itself.
- Space beside or below it for the hanging reference packet.
- A surface that can safely take the mounting hardware and weight.
- Enough clearance in front for someone to stop and use it.
- No door that regularly opens across the board.
- No furniture or storage that is likely to block it later.
- Reasonable distance from bathroom humidity, direct steam, and heavy cooking grease.
- Limited direct sunlight where possible, especially if the wall gets strong sun for several hours a day.
Once you know where the board is going, you can decide whether a landscape or portrait layout fits the space best and where the reference packet will hang.
The physical setup is covered in Building the House Board.
5.1.4 Building the House Board: Materials & Layout
Set up the house board before residents move in. You want the board and reference materials ready when you start onboarding people, rather than adding the system after residents are already used to getting routine house information some other way.
The physical build is simple. The main thing is giving yourself enough space for the parts your house actually uses and setting up the reference materials so residents can find and handle them easily.
A. Choosing Board Size and Orientation
Start with a corkboard around 24 by 36 inches or larger. If the house uses the chore system and you have the wall space, sizing up gives you more room to work with.
Landscape is the preferred layout. The chore system usually takes up a significant amount of space, and a wider board gives you more room for the wheel, points grid, and community area without everything feeling crowded.
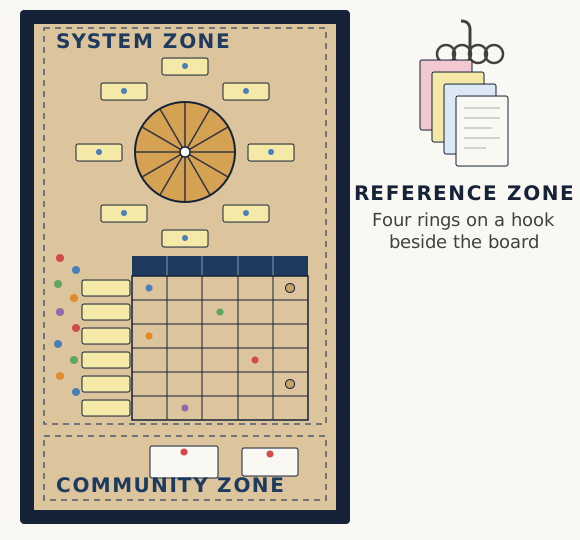
Portrait works when the available wall is narrow. The same functional areas still apply, but they are arranged differently to fit the space.
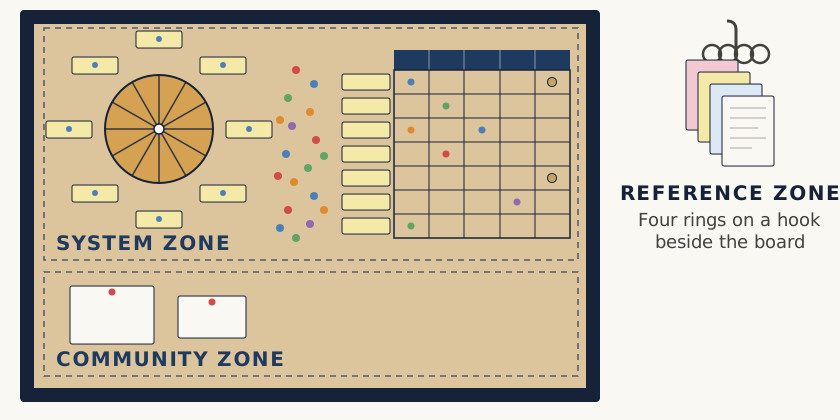
Recommended landscape layout. Left to right in the system zone: the chore wheel with resident name cards ringed around it, the loose pin supply, and the points grid. A house that does not use the chore system gives that space to the community zone instead.
Alternate portrait layout. The same working areas stacked rather than spread. Chore wheel above, points grid below, pin supply down the side, community space at the foot. Use it when the available wall is narrow.
No chore system. The board loses two of its three working areas and the community zone takes the space. The reference packet does not change, because the standing house information is not what the chore system was holding up.
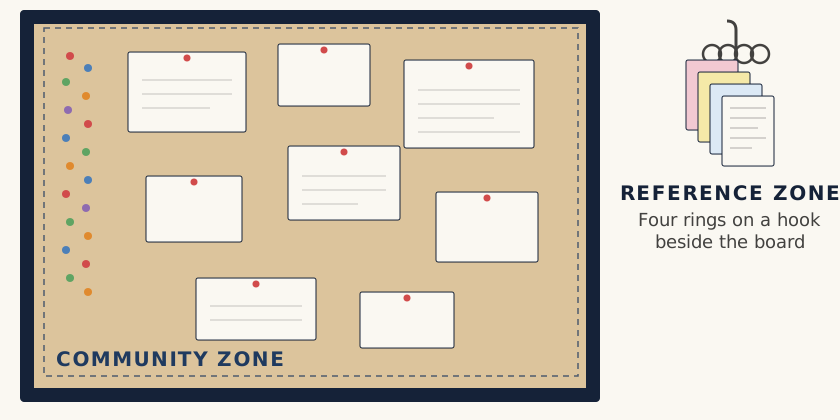
The diagrams use three planning zones:
- Reference zone. The standing reference materials kept with the board, usually hanging beside or below it.
- System zone. The chore wheel and points grid, if the house uses them.
- Community zone. Open cork for announcements, coupons, reminders, and other temporary household information.
These are planning terms only. You do not need to label the finished board.
B. Materials
Required:
- Corkboard, approximately 24 by 36 inches or larger
- Push pins, 50 to 100
- Clear plastic sheet protectors
- Keyrings or binder rings for the reference sets
- One or more sturdy wall hooks, nails, or picture hangers for the reference materials
- Appropriate hardware for mounting the corkboard
Useful to have:
- Ruler
- Scissors
- Hammer
- Black permanent marker
If the house uses the chore system, the wheel and points grid have their own materials. See Building the Chore Wheel & Points Grid.
C. Laying Out the Board
Lay everything out before mounting it. Put the board flat on a table or floor, position the pieces, and make sure the arrangement works before you start putting holes in the wall.
If the house uses the chore system, reserve that area first. The chore wheel and points grid often take up most of the corkboard, so give them the room they need before placing anything else.
Once the chore area is established, use the remaining cork for the community area. You still want enough open space for announcements, coupons, reminders, and other temporary household information, but the exact amount depends on how much space the chore system needs.
If the house does not use the chore system, the board can be much more open and the community area can take up most of the cork.
The reference materials usually hang beside or below the corkboard rather than taking up space on it.
Optional: Post a Quick Reference Beside the Board
If you have extra wall space, you can post a protected copy of one frequently used reference beside the board instead of keeping everything only in the hanging packets.
The House Info Sheet is usually the most useful choice because residents are much more likely to need routine house information than emergency instructions.
You can also post the Emergency Quick Reference separately if you want it immediately visible. This is optional and usually only practical when there is enough adjacent wall space to do it without crowding the rest of the setup.
D. Setting Up the Reference Materials
Print the reference documents, place them in clear sheet protectors, and group them onto rings.
A practical grouping is:
- Community Contract
- House guides and etiquette
- Conflict resolution materials
- General house references, including the House Info Sheet and Emergency Quick Reference
The Community Contract gets its own ring so the multi-page agreement stays together. The house guides and etiquette materials get their own ring, the resident-facing conflict resolution set gets its own ring, and the remaining general references share another.
You do not need one hook for every ring.
If you have the wall space and like the separate look, you can hang the rings individually or divide them between several hooks. If that looks too busy or takes up too much space, hang all of the rings from one sturdy hook instead. One hook is completely fine as long as the hook and wall anchor can comfortably hold the combined weight.
You can also use three hanging points and place the Community Contract ring and house etiquette ring together. They remain separate document sets, but they can share the same hook.
The number of hooks is not important. The reference sets just need to stay organized, secure, and easy for residents to take down and use.
Do not be afraid to use subtly different paper colors to make different types of information easier to recognize. For example, you might print the Community Contract on light blue paper so the whole multi-page set is visually connected. The House Info Sheet or Emergency Quick Reference might use pale yellow or orange so they are easy to spot.
Keep the colors light enough that the documents remain easy to read.
Use Sheet Protectors for the Reference Packets
Use sheet protectors rather than laminating the standing house references. House information changes, and protectors let you replace one page without rebuilding the packet.
The Cleaning Bucket Reference is the exception. Its content is stable and it lives around water and cleaning supplies, so a laminated copy is appropriate.
E. Mounting and Finishing
Mount the corkboard with hardware appropriate for the wall. Remember that the finished board may carry the chore system, pins, and other materials, so mount it securely rather than relying on hardware meant only for a lightweight empty frame.
Mount the reference hook or hooks somewhere residents can easily reach them. Use hooks that make the rings easy to lift off and put back on.
The reference packets are meant to be removed from the wall when someone uses them. A resident should be able to take down the ring they need, flip through the pages, and hang it back up when they are finished.
Check that the corkboard is level and that the full surface is reachable without stretching or crouching.
Push 50 to 100 pins directly into the community area before you finish. Leave them on the board where they will actually be used. Residents should be able to post something without having to find supplies first.
Do not leave the community area completely blank when the house is new. Post one temporary item yourself so residents can immediately see what the space is for. A coupon, local event flyer, household announcement, or similar item is enough.
Once the board is mounted, the reference materials are hanging, and the community area is ready to use, the physical setup is complete.
Companion SOP
- SOP - House Board Creation. Build and install the complete house board, reference sets, community area, and chore-system space.
Keeping the board current after that is covered in Maintaining & Updating the House Board.
5.1.5 Maintaining & Updating the House Board
The house board only works as a reference if residents can trust what is on it. If the information is outdated or the reference materials are regularly missing, people eventually stop checking there first.
Maintenance does not mean constantly changing the board. Most of the standing information is supposed to stay the same. The goal is to keep the board accurate, complete, and usable.
A. Routine Checks and Event-Triggered Updates
There are two kinds of house board maintenance.
The first is the routine check during the monthly property visit. This is when you catch the small things that accumulate over time: expired notices, damaged sheet protectors, missing pages, a low supply of push pins, or something that was moved and never put back.
The second happens when something changes. Do not wait for the next monthly visit to update information residents are actively relying on.
A resident moving in or out may change resident-specific parts of the board. A new contact, parking arrangement, WiFi password, or other house detail may require a new reference sheet. If the Community Contract changes, the reference copy needs to change with it.
The board should reflect the house as it operates now, not how it operated at the last scheduled inspection.
B. Standing Information and Temporary Information Age Differently
The standing reference materials do not need to change just to make the board look active. If the information is still correct, leave it alone.
The community area is different. Announcements, coupons, event flyers, maintenance notices, and other temporary items have a useful life. Remove them when they are no longer relevant so the open area does not turn into storage for old paper.
You can add something yourself when you have something useful to share, but there is no reason to manufacture content just to make the board look busy.
C. Maintain the Board, Then Maintain the Systems
The house board brings several systems together, but this section does not replace the maintenance process for those systems.
If the chore wheel or points grid is not working, troubleshoot the chore system in The Chore System: Setup, Maintenance & Troubleshooting.
If a house rule, communication process, or conflict resolution tool needs to change, make that decision where the system itself is covered, then update the board materials to match.
The board's job is to keep the current version of those systems visible and available.
The step-by-step board check is covered in SOP - House Board Maintenance and is included as part of the monthly property visit process.
Companion SOP
- SOP - House Board Maintenance. Check the house board during monthly visits and update it when residents, house information, or reference materials change.
Template Reference
This chapter uses:
Operational Template Pack
- PRN - House Info Sheet
- PRN - Emergency Quick Reference
- PRN - Bathroom Culture Guide
- PRN - Kitchen Guide
- PRN - Fridge & Freezer Guide
- PRN - House Mailbox Guidelines
- PRN - Parking Guidelines
- PRN - Resident Shared Storage Guidelines
- PRN - Shared Tools, Supplies & Equipment Overview
- CHK - Cleaning Bucket Reference
- PRN - Chore Descriptions
- PRN - Chore Board & Points
Get the Operational Template Pack →
Legal Template Package
- ADD - Community Contract Lease Addendum
Template Reference
Resident-facing conflict resolution materials:
Operational Template Pack
- CR-00-PRN - Conflict Resolution Start Here
- CR-01-PRN - The QuickConnect
- CR-02-PRN - 5 Step Flow Conflict Resolution Map
- CR-03-WKS - 5 Step Flow Prep Worksheet
- CR-04-CHK - 5 Step Flow Step-by-Step Checklist
- CR-05-PRN - Feelings & Needs Cheat Sheet
- CR-06-FRM - Our Shared Solution
Template Reference
Operator and facilitator conflict resolution references:
Operational Template Pack
- CR-05-REF - Feelings & Needs Reference
- CR-06-REF - The Shared Solutions Guide
- CR-07-REF - Facilitated Conversation Companion